


Overview

The Users section allows administrators to view, create, edit, and delete user accounts within the system. It provides an interactive table with filtering, search, and pagination tools to manage users efficiently.
Main Components
1. Toolbar (Top Right)
- ➕ New – Opens a form to create a new user.
- 🔄 Refresh – Reloads the list of users to display the most recent data.
- ❌ Delete – Deletes selected users from the list (a confirmation prompt may appear before deletion).
2. Users Table
The table displays all users currently registered in the system.
Each row represents a single user record with the following columns:
- ID – The user’s unique identifier (clickable to view user details).
- User Name – The user’s display name.
- Profile – The user’s assigned profile or role.
- Code – A custom or internal reference code.
- Status – Indicates whether the user is Active or Inactive.
- Email – Displays the user’s registered email address.
3. Search Field
Located at the top-right of the table, the Search box allows you to quickly find users by typing any part of their information.
- The search applies to all columns (e.g., ID, Name, Status, Email, etc.).
- As you type, the list updates automatically to show matching results.
4. Pagination Controls
At the bottom of the table, you can:
- Adjust how many entries are displayed per page (default: 25).
- Navigate between pages using the ◀ ▶ controls.
Typical Actions
Add a New User
- Click the New button.
- Fill in the required fields (Name, Profile, Status, etc.).
- Click Save to register the new user.
Edit an Existing User
- Click the User ID (e.g., 000005) to open the details.
- Update the information as needed.
- Click Save to apply the changes.
Delete a User
- Check the box next to the user(s) you want to remove.
- Click the Delete button.
- Confirm the deletion when prompted.
Notes
- The search is case-insensitive.
- Any changes (additions, edits, or deletions) take effect immediately after saving.
- Use Refresh to ensure you are viewing the latest data.
User Details – User Management Manual
Overview
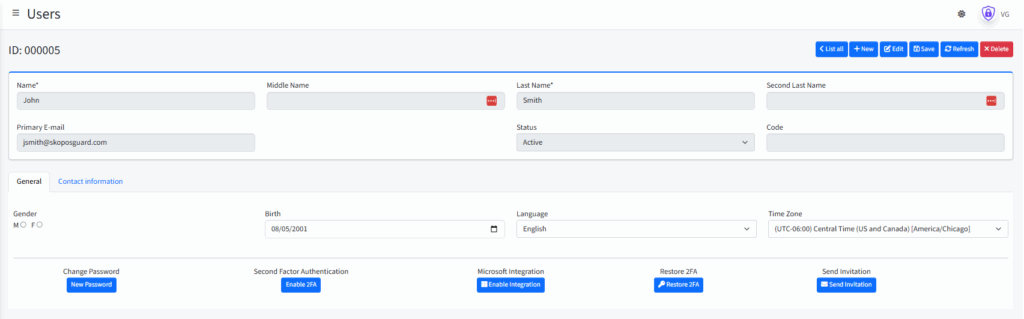
The User Details page allows administrators to create, edit, or view detailed information about a specific user.
From this screen, you can update personal details, manage authentication settings, integrate the account with Microsoft, and send invitations or reset credentials.
Header Controls
At the top-right of the screen, you will find the main action buttons:
| Button | Description |
|---|---|
| List all | Returns to the main list of users. |
| + New | Creates a new blank user record. |
| ✏ Edit | Enables editing mode for the current user. |
| 💾 Save | Saves any changes made to the user information. |
| 🔄 Refresh | Reloads the user data to ensure the information is up to date. |
| ❌ Delete | Deletes the current user record (confirmation required). |
User Information Section
At the top of the form, you can view or edit the basic identity and account information.
| Field | Description |
|---|---|
| Name / Last Name / Second Last Name / Middle Name | User’s full name information. Fields marked with * are required. |
| Primary E-mail | The user’s main email address (used for communication and authentication). |
| Status | Defines whether the user account is Active or Inactive. |
| Code | An internal or custom reference code assigned to the user. |
Tabs
There are two tabs available in this section:
1. General
Contains basic personal and system information:
| Field | Description |
|---|---|
| Gender | Select Male (M) or Female (F). |
| Birth | User’s date of birth. |
| Language | Preferred language for the user interface. |
| Time Zone | Defines the time zone used for timestamps and notifications. |
2. Contact Information
Used to manage additional contact details such as phone numbers, addresses, or secondary emails (if available).
Account Management Actions
At the bottom of the page are buttons for managing authentication and integration options:
| Button | Description |
|---|---|
| New Password | Allows administrators to reset or assign a new password for the user. |
| Enable 2FA | Activates Two-Factor Authentication for enhanced account security. |
| Enable Integration | Links the account with Microsoft services (e.g., Azure AD or Microsoft 365). |
| Restore 2FA | Resets the user’s 2FA configuration in case of device loss or setup error. |
| Send Invitation | Sends an activation or onboarding email invitation to the user. |
Notes
- Required fields are marked with an asterisk (*).
- Changes made to user information will only take effect after clicking Save.
- Use Refresh to discard unsaved changes and reload the stored data.
- 2FA and integration options depend on your system’s security configuration.